Looking back, I really don’t know what made me try it.
After hearing a coworker talk about doing stop-motion animation with her students, I thought it would be a perfect culmination for the Story of Bill my second graders had been working on for the past month.
But really. Second graders? And a new technology I had never even tried? With a new school district whose technology equipment I wasn’t even familiar with?
All I can say is, thank goodness my logical side wasn’t shouting these worries too loudly, because this stop-motion animation project turned out to be one of the best projects I’ve done. I mean, what better way to publish a story then by actually making it come to life?
Check out this past blog post for all you need to implement the Story of Bill mini-unit in your own classroom.
Did it take a week longer than I had planned? Yes.
But was it worth it? Totally.
What makes me happiest is how over-the-moon the kids were with their final movies. I even had parents at Parent-Teacher conference night telling me about how they watched the movies over and over as a family.
Interested in using Stop-Motion animation with your students? I encourage you to give it a try! Check out my tips below for how to incorporate a Stop-Motion Animation project into your classroom.
And remember…if seven year olds can do it, anyone can do it!
Step One: Choose your platform
The first thing you need to do is decide what program you will use. Our district does not have ipads, so I had to get creative on different methods I could use. If your district DOES have access to ipads, there are a ton of free stop-motion animation apps. There are also downloadable programs that you can put onto PCs, if your district has laptops. Monkeyjam was one that I researched and found pretty user-friendly. Our district requires special permission from the tech department to download new programs, so I knew I wouldn’t be able to get Monkeyjam on my class’s computers on my own.
In the end, I chose to use PicPac – a free app that I downloaded onto my Android phone. It was feasible for me to only have one device because I was doing this with only 4 students at a time. This app was SUPER easy to use; it’s very intuitive and my 7-year-olds picked it up in no time.
Step Two: Introduce the Project To Your Students
I began by asking who had seen The Lego Movie. I explained that it was made using Stop-Motion Animation. Then I showed this clip of a Lego short (1:45). I asked if anyone could hypothesize what Stop-Motion animation meant. After a little discussion, I explained that stop-motion animation is when you take a bunch of pictures, then play them back quickly to make it look like action is taking place. A few kids related it to flip books. Next, I used a clip from this video to give a behind-the-scenes look at making a Stop-Motion movie.
The video above, from Rachel Wintemberg, was instrumental in helping me incorporate the stop-motion project in my class. I’d encourage anyone to watch the entire video before starting the project in their own class.
Step Three: Prep Your Students
We had already finished writing our stories when we got started with the project. I only get to see my students for 30 minutes a day, so I knew setting aside time to make props, backgrounds and characters was out of the question. I gave the students a week to create anything that they wanted for their movie.
Students came in with an array of props, from backgrounds drawn with crayon to 3-D cotton ball clouds to tiny Lego people.
Your students also need to prepare by practicing reading their stories. This was the hardest part, because the students had a lot less time than they thought they’d have. Most students had to read their stories in 25 seconds. While their stories were only 1-2 paragraphs long, this still was a challenge.
Step Four: Set up your Animation Station
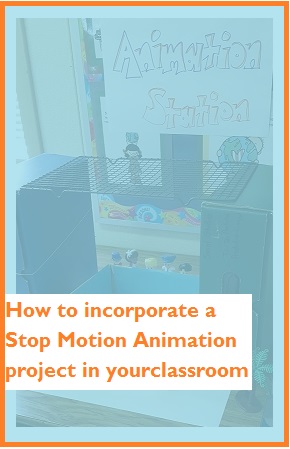
After watching the video above, I realized the importance of having a secure spot to set the camera, so I didn’t have to entrust a 7-year-old to hold it steady the entire time. This is a picture of my “Animation Station.” As you can see, a cookie rack is a perfect tool to set your camera on to make sure that your camera doesn’t move.

Step Five: Create Your Movies
- The student organized his backgrounds in order of how they appeared in his movie. I read through the story and we marked down every time the setting changed.
- I set my phone up on the cookie rack so it was facing the scene below, opened the PicPac app and clicked on “Take Photos.”

- I changed the interval to “10 seconds.” This meant that my student had 10 seconds to move his characters before the camera would go off.

- I modeled the first couple of photos, explaining that characters should only move a tiny bit at a time. If a character is supposed to walk across the lawn, they needed to show all of the steps of going across, not just one picture that showed before and one that showed after. I was honestly surprised at how well my students picked up on this concept!
- When we finished using a setting, I would hit “Pause” and we would switch out the background for the next one.
- At the end of filming, we looked through the pictures together and only deleted any pictures that showed a hand. Next, we were able to give it a title and choose how long to stay on each photo. While it looks smoothest if you can stay on each photo for the shortest amount of time, that results in a very short movie. I usually chose 1/4 of a second for each photo.


- The last step is recording audio. Click the microphone, and it will count down from 3 before starting to record.

- My favorite part of using PicPac was that it let me share the video. I ended up uploading each video to our Google Classroom page so students could watch them from home.

Final Tips:
- Have something for your non-filming students to work on so you can be free to help your student film.
- Encourage your students to take a lot of pictures, which means only moving their characters a TINY bit at at time. I modeled the first pictures for each student. The more pictures they take, the longer their movie.
So I encourage you – give stop-animation a try! Your students will LOVE it, and you will love the high level of engagement they will show.
